 |
Practically by definition, hot
rods are prone to overheating. (After all, they’re not lukewarm rods, right?) Seems
that a high-performance powerplant and overheating go hand-in-hand. It doesn't need to be
this way. Too many people try to re-engineer a system that has proven itself for
years and years. Of course, to prevent the occasional boil-over, you can do the obvious,
such as turn on the heater (to dissipate heat from the block, since the heater core is
basically a miniature radiator) or drive at a slower speed (unacceptable). You also can put
straight water in the radiator (which is actually more efficient for heat transfer than a
50/50 mix of coolant and water but offers none of the rust and corrosion protection), or
you might find that using synthetic oil or other super-slick lubrication might lower your
gauge a few degrees. If none of these quick fixes do the trick, and a pegged temp gauge is
a more persistent problem, keep reading for more insight into this issue.
Believe it or not, many
overheating problems stem from not keeping enough fluid in the radiator. Check your
radiator fluid often. Add as much as the system will take. If your vehicle is not already
so-equipped, install a coolant overflow system as a way to increase the capacity of your
cooling system. As the fluid expands due to heat, a radiator will blow off the excess fluid
lowering the overall volume of coolant in the system and the overall efficiency. A coolant
recovery kit will keep the cooling system at it's fullest.
Next, be sure all
factory-installed components are in place and functioning properly, including:
-
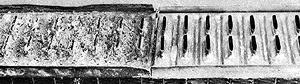 the radiator - It
is important that air be able to pass easily through the radiator. If the radiator fins
become folded, they should be carefully straightened with an awl. Pictured at right is a
graphic example of good and bad radiator condition. Whether you realize it or not, the
inside of your radiator could look like this and be the cause of your cooling problems.
Drain your radiator and look down the filler hole. If your radiator looks like the left
side of this photo, you need the help of an experienced radiator shop to properly flush
and clean your vehicle's cooling system.
Even the
most cared for cooling system will eventually plug the radiator. To
remedy, the radiator has to be removed and boiled out in a vat. Then the
top and bottom tanks are removed and a rod is physically run through
each radiator tube to clear it out. The tanks are then soldered back on
and the radiator reinstalled. That's the main service that radiator
shops do and is just a normal part of normal long-term vehicle
maintenance. the radiator - It
is important that air be able to pass easily through the radiator. If the radiator fins
become folded, they should be carefully straightened with an awl. Pictured at right is a
graphic example of good and bad radiator condition. Whether you realize it or not, the
inside of your radiator could look like this and be the cause of your cooling problems.
Drain your radiator and look down the filler hole. If your radiator looks like the left
side of this photo, you need the help of an experienced radiator shop to properly flush
and clean your vehicle's cooling system.
Even the
most cared for cooling system will eventually plug the radiator. To
remedy, the radiator has to be removed and boiled out in a vat. Then the
top and bottom tanks are removed and a rod is physically run through
each radiator tube to clear it out. The tanks are then soldered back on
and the radiator reinstalled. That's the main service that radiator
shops do and is just a normal part of normal long-term vehicle
maintenance.
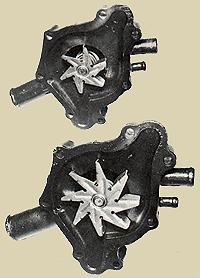
The pump
with the smaller impeller is the one supplied when you order the heavy-duty cooling system
or have AC. The main idea is to reduce pump cavitation, which is caused by excessive
turbulence in the pump. These pumps are Chrysler parts, but other OEM's use similar ways
of fighting the same problem; some use larger pump pulleys to reduce pump RPM, some use
impellers with fewer vanes, etc. |
-
the
fan clutch, if so equipped - If your car came originally with a clutch fan, it
should have one regardless of the type of engine you are currently running. To check that
it's functioning properly, start the car with the hood up, run the engine for one minute
and then turn the engine off. If the fan appears to free-wheel or rotates more than five
times, the clutch mechanism is worn out and should be replaced. As a rule, you lose 10
percent of your clutch fan efficiency for every 10,000 miles of driving. This means that a
three-year-old fan clutch is a probable candidate for replacement, and a four-year-old fan
clutch is likely to be running disengaged and should be replaced.
-
the
water pump - When they fail, it's usually obvious. There's a lot of noise, and
often the fan will wobble. Occasionally,
though, a pump can fail in a more subtle way. The impeller can slip on the shaft, so the
pump doesn't pump, or the impellers can become eroded from corrosion. However, it's
probably not the water pump, even though it's often the most-accused component of an
improperly operating cooling system. The water pump does one of three things: it either
works, leaks, or falls apart. If your water pump appears to be coming apart, replace it
immediately. The water pump shaft is the mount for the fan, and loose fans are no fun (and
deadly dangerous). Leaks can usually be noted by white or yellow stains on the pump
or hoses. If neither of these conditions exist, you can check your water pump by removing
the thermostat and refilling the system with water. Leave the radiator cap off and watch
the water in the radiator. If it flows through the radiator, you water pump is good. But
if there is limited flow, it may be the water pump and it could be a clogged radiator.
Further investigation is necessary.
- all
of the factory-installed air dams
-
the
shroud - One of the biggest mistakes made concerns those cool-looking fan
shrouds. We typically fabricate them from aluminum if the car is to be a show car, or
if the owner just wants that cool polished look. However, the plastic jobs that
Detroit spent so many millions of dollars to design and produce do an excellent job. No
matter what type of shroud you are running, make sure it is sealed to the radiator, so
that all air must come through the radiator, with nothing from around the sides. There can
be no (or VERY little) space between the radiator and shroud for it to work properly.
-
the
radiator cap - Most people overlook the importance of a good radiator cap. The
boiling point of water is 212 degrees Fahrenheit. You get three (3) degrees more boiling
point for every one (1) pound of pressure that a radiator cap can hold. Most radiator caps
will hold 16 pounds of pressure, therefore, with a good radiator cap, you will get 48
additional degrees Fahrenheit (3 x 16 = 48) before your car will overheat. (Remember,
water boils at 212 degrees and allowing the additional 48 degrees with a good radiator
cap, gives you a total of 260 degrees before your engine overheats.) Have your radiator
cap tested to ensure it holds the stated pressure. Even if it is new, you have no
guarantee it works properly. Remove your radiator cap and inspect the pressure spring and
rubber grommet. The spring should move freely and the rubber grommet should be the same
size as the base behind the grommet, and not be torn or expanded. With time, the rubber
grommet will tend to expand and stretch. When this happens, the cap will not contain the
radiator pressure and the boiling point of the anti-freeze/water mixture will decrease and
can allow the system to boil over.
the thermostat -
ALWAYS run a thermostat! Removing your thermostat can lead to cooling problems. The
general idea behind a thermostat is to warm the cooling system so that the heater core
will function properly. The thermostat also works to slow the flow of water so that it has
time to transfer heat through the radiator. Removing the thermostat prevents this heat
transfer and can lead to overheating. There are two ways to tell if your thermostat is
bad: the engine overheats quickly (within 15 minutes of start-up), and if your rubber hose
system "thumps" (which means that the water pump is working, however the flow of
fluid is stopped by the closed thermostat.) Check your thermostat by placing it in a pan
of water on the stove and checking water temperature with a thermometer. If the thermostat
does not open at the proper temperature, buy a new one. No matter how
new a thermostat is, they can fail at anytime.
the
hoses - Another area that might be overlooked when attempting to
diagnosing an overheating problems is the radiator hoses. It's possible
the hoses might be collapsing while the engine is being revved, severely
limiting the coolant flow. This is easy to check, however. Carefully rev
the engine while you watch the radiator hoses for signs of their
collapse. There are supposed to be 'springs' located in the lower
radiator hose to prevent this collapse...make sure the wire spring is
still there and in good shape.
You know those ugly plastic
pieces on some late-model cars that go between the radiator and the grill that everybody
throws away? They serve more of a purpose than to keep you from reaching that latch when
the cable breaks...they are to direct fresh outside air to the radiator. Even if
it's 100 degrees outside, that air is way cooler then what's under the hood, and without
the panel to direct the air, the air flowing through the radiator becomes super heated. As
the fan pulls it through, it dumps the air into the engine compartment. With no way of
flowing through (at cruising speed, there exists a venturi effect below the car that pulls
the air out, and directs it under the car and out the back) the air will escape by using
the path of least resistance. Many times, this is back out the front, where the fan then
pulls the already heated air back through the radiator again. This circulation continues
over and over, and as the air gets hotter and hotter, it begins heating the water to some
point, and the dreaded boil over is eminent.
Dyno-tuning the engine for a
precise setting of the ignition timing, along with rejetting the carb for a richer fuel
flow, should help to prevent a lean-out condition and also lower exhaust temperatures.
Lastly, you want to make sure
that the fan moves enough air to do the job. Those very pretty, high performance flex fans
look real trick, but they really don't move enough air for a street-driven car. In a race
application, they more than suffice, due to the fact that either you are only running the
car for very short amounts of time, as in drag racing, or the car is running at very high
RPM's and is constantly moving, at which point theses fans "flex" to a flatter
profile, which greatly reduces air drag, but moves little to no air. This is how they are
designed to work and they do a fine job in the environment for which they were designed.
Simple common sense tells us that a fan with less attack angle and less surface area is
going to move less air than its stock counterpart. The point is, do not sacrifice the
ability to move the air for the look of the fancy flex fan. If you must replace the
fan unit, do so with the largest diameter, and most drastic attack angle you can.
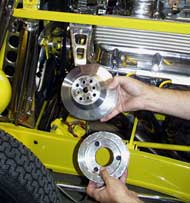 Also, another thing to
consider as a possible source of heating woes is under-driven pulleys. An old racer’s
trick is to use under-drive pulleys that reduce power losses from belt-driven accessories
by increasing the diameter of the pulley. Under-drive pulleys turn plenty fast at high
speeds, but the drawback for street duty is too slow of an impeller speed for the water
pump. In the photo at right, the stock pulley on top is a six-inch unit and the owner had
installed a five-incher for more engine power, with a six-incher on the bottom. However,
for the amount of horsepower they supposedly save, they create overheating and
undercharging problems which will rob more horsepower than the pulleys used in the first
place. (See the table at the bottom of the page for correct OEM Oldsmobile
pulley sizes.) Also, another thing to
consider as a possible source of heating woes is under-driven pulleys. An old racer’s
trick is to use under-drive pulleys that reduce power losses from belt-driven accessories
by increasing the diameter of the pulley. Under-drive pulleys turn plenty fast at high
speeds, but the drawback for street duty is too slow of an impeller speed for the water
pump. In the photo at right, the stock pulley on top is a six-inch unit and the owner had
installed a five-incher for more engine power, with a six-incher on the bottom. However,
for the amount of horsepower they supposedly save, they create overheating and
undercharging problems which will rob more horsepower than the pulleys used in the first
place. (See the table at the bottom of the page for correct OEM Oldsmobile
pulley sizes.)
Water is better at
absorbing the heat than antifreeze - Something to try that doesn't cost very much
is to drain and flush the system of antifreeze, then replace with distilled water and a
couple of corrosion preventative additives. There are several manufacturers of water
wetter (like Redline) that when
added to the water will enhance the ability of water to absorb the heat. (But don't bother
adding it to a mixture of anti-freeze and water...it will do no good.) Secondly, you
will need some coolant system lubricant (for the water pump) that you can get from
Prestone.
Keeping all of these points in
mind, it is possible to have an engine that runs well, is still of the performance breed,
and stays cool. We have all seen very potent big blocks running around that run as cool as
a stock vehicle and some of these run air-conditioning!
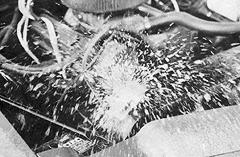
We've probably all experienced another problem closely associated with a hot engine...and
that's when your car fails to start after fully warmed up. The starter barely turns over,
if at all, but once the car sits for a while the problem seems to disappear. This hot
start issue is very common in a vehicle equipped with headers. The starter experiences
what is known as heat soak. As the engine is run, the armature in the solenoid expands due
to the heat and basically is frozen to the case. An easy way to check that this is
happening is to direct a small stream of water, such as a garden sprayer, at the
solenoid
case to cool it...and then the starter will function properly. There is a heat shield
available from a number of sources designed to absorb this heat, keeping it from the
solenoid. Another solution is to install a Ford-style remote starter relay which directs a
little more current to the solenoid, allowing it create a stronger magnetic force to pull
the Bendix in the starter. (Make sure you get a true Ford part and not a cheap knockoff.)
For more information on this procedure, visit the following link:
Summit
Racing also carries everything in kit form you'll need to do this conversion.
|
Proper
OEM Oldsmobile factory pulley sizes
for the correct flow rate of coolant through
the radiator for proper cooling is as follows:
AC applications
7 1/8" diameter crank pulley
6 3/8" water pump pulley
442 heavy duty cooling system
6 3/8" crank pulley
6 3/8" water pump pulley
Standard, non-AC, non-442 HD
6 3/8" crank pulley
7 1/8" water pump pulley |
|
|
|

