Oldsmobility.com - Your 1967 Olds Cutlass / 442 Headquarters


Converting From Drum
To Disc Brakes

for General Motor's A-Bodies

ON THIS PAGE:

- Converting to standard front disc brakes
- Converting to larger B-body brakes
- Rear drum vs. rear disc brakes
- Aftermarket Vendors
- Disc Brake Troubleshooting

Converting to standard front disc brakes

When swapping front disc brakes for your existing drums, the front brake assembly from any GM A-body from '67 through '72 will bolt right on to your '67. The following cars from 1964-1972 are classified as A-bodies:

  • Buick Skylark, Special, Gran Sport, and Sport wagon
  • Chevrolet Chevelle, El Camino, and Malibu
  • Oldsmobile F-85, Cutlass, and 442
  • Pontiac Lemans, GTO, and T-37

However, the '67-'68 power brake setups utilize a four-piston caliper with a two-piece rotor and should be avoided. They are somewhat hard to find. You cannot find the 2-piece rotor new as they have not been manufactured for over 20 years due to a perceived safety hazard. There are one-piece rotor replacements available, but even these can be hard to find. The single-piston system used on '69-'72 cars is much more common and easier to locate. It is completely interchangeable with the earlier system (at the spindle level). (Read sidebar.) The disc brake rotors for these setups are 10" in diameter. ('73-77 A-body disc brake setups CAN be used, but since the ball joints are a different size and the spindles are taller, it requires some modifications. Another popular swap is to use the taller '73-up B-body spindles which allow the use of 11" or 12" disc brakes, but this requires the use of custom upper control arms. More on both of these swaps are discussed below.)

The '69-'72 single-piston system is better for two reasons. First, the calipers slide side-to-side, which allows for slight warpage in the rotor - the four-piston calipers are hard mounted to the spindles and any rotor wobble causes the pistons to be pushed back into the caliper, which increases pedal travel upon initial application. This is not what you want in a panic stop! Second, the four-piston design uses smooth bores in the caliper and pistons with grooves for the seal rings - just like the pistons in an engine. Unfortunately, the cast iron caliper bores are susceptible to rust and pitting, which is why companies like White Post make a tidy profit lining these calipers with stainless sleeves. The single-piston calipers reverse this by having the seal ring set into a groove in the bore. The sliding surface is the OD of the piston, not the ID of the bore. To further improve this, the pistons are chromed, which minimizes their likelihood of rusting. More importantly, it's pretty cheap to replace the piston verses having the caliper sleeved.

Other suitable donors include:

  • '70-'72 Chevrolet Monte Carlo or Pontiac Grand Prix
  • '67-'69 Pontiac Firebird/Chevrolet Camaro
  • '67-'74 Oldsmobile Omega/Chevrolet Nova/Buick Apollo

NOTE: You will need to use your current steering arm with these setups.

When you find an appropriate donor car, you'll need to get everything from the steering knuckle (spindle) out, including:

  • steering knuckle (spindle)
  • splash shields (backing plates)
  • rotor and calipers - New rotors and calipers are available from your local auto parts outlet, but its nice to have the originals to give as a core deposit.

  • hoses - Anytime you're doing a swap of this nature, it's best to replace the brake hoses. The reason I suggest getting the hoses from the donor car is for length verification. After installation, make sure the brake hoses aren't pulled tight when the wheels are turned. A friend used brake components from a Chevelle and noticed after installation that the Chevelle hoses were too short. However, it was a simple task to go to the parts store and find the longer hoses with the correct ends.

  • hard lines - you will need new hard lines from the master cylinder to the proportioning valve and the proportioning valve to the distribution block. The front hard line from the master cylinder to the distribution block and the hard lines on the output side of the distribution block will be the same as for drum brakes. Get ALL the forward metal brake lines if they are still usable. From what I understand, power discs require a larger diameter hard line. The connectors on the end of the lines should have been different as well. I was told that this was a obvious indicator to the factory workers that the correct lines were installed to the proper type brakes. You can buy the conversion line set that goes from the master cylinder to the front discs. These lines connect up to the proportioning valve and to each brake area. A popular upgrade is to use stainless steel lines. If you do so, you really have to tighten (read over-tighten here) just to get the ends to seal properly because the stainless is so hard.


    Pictured above are the salvage yard components needed to do a standard disc brake swap, including disc brake backing plates, caliper mounting brackets, master cylinder, spindles, power booster, calipers, hard lines, metering block, proportioning valve and necessary attaching hardware. If you're getting these items from a "you-pull-it" type of operation, be sure to also grab the brake hoses and brake hose attaching brackets.

  • master cylinder and pushrod - Disc brake master cylinder is available at your local auto parts outlet. Be certain you get the correct version. There are two different-length pushrods used between the master cylinder and the power booster unit: The first is long push rod, which protrudes into the master cylinder about 1-1/4 inches. The second type is a short push rod, which does not protrude into the master cylinder, often referred to as a 'flush mount'. To verify whether you have a long or short push rod, simply remove the two nuts holding the master cylinder to the power booster unit, slide the master cylinder back and look at the push rod going into the master cylinder. It will be either flush or extended.

  • proportioning valve -   Don't confuse the brake proportioning valve (aka metering valve) with the brake distribution block. The rectangular valve mounted on the frame rail under the drivers seat (with the brake warning light electrical connection) is the brake distribution block. The round cylindrical one mounted just under the master cylinder is the brake proportioning valve. A stock drum setup has no proportioning valve, only a distribution block. The '67-'70 disc brake setups used this same distribution block and a separate proportioning valve mounted on a bracket under the master cylinder. The '71-'72 disc brake setups used a combination valve which had the proportioning valve integrated into the distribution block, and can still be purchased new from GM for about $60.

  • You must install the proportioning valve behind the inline electrical switch that signals the dash light or it will stay on when the brakes are applied. It must be attached to the rear brake line after it leaves this block. You can make your splice inside the frame on the drivers side where the rear brake line is located. There is plenty of room there and hard lines can be routed easily enough. (Note: I've been warned against using a Nova/Apollo proportioning valve. I was told they are calibrated for the lighter car.)

  • brake hose frame brackets (if the donor car is an A-body). These are not available at the parts store. The drum brake and disc brake brackets are different. If you forget to remove the brackets, you can make the drum brake brackets work by filing the brake to the shape of the brake hose metal end.

  • dust cap

NOTES

NOTE 1: If you're planning to convert a to a stock 10" rotor setup, your 14" SSIIs might not fit - even though they came that way from the factory. SSI rims will definitely NOT fit. (Be sure to read Identifying Oldsmobile Super Stock Wheels for confirmation on whether you can use current Rally rims.)

NOTE 2: If the components you're purchasing are at a local swap meet, and you want to verify the year of the parts, look at the steering knuckle. '72-and-earlier had a two-piece unit (the steering arm bolts onto the knuckle), while the '73 and later one-piece units had the steering arm cast into the knuckle. Make sure the master cylinder was from a disc-brake-equipped vehicle. They are different. The front reservoir of a disc-brake master cylinder is larger than the rear reservoir (see photo above). The reservoirs on a drum-brake master cylinder are the same size.

NOTE 3: Be sure to bench-bleed the master cylinder before installing it. As for bleeding the brakes alone in your garage, use a one-way inline valve on the bleeder hose. I put the bleeder hose in a jar containing some brake fluid so there is less chance I can draw air back into the system too. Then I crack the bleeder just a little. I then bleed them myself starting from the point farthest away from the master cylinder and working towards the nearest (right rear, left rear, right front, left front.) Never had a problem. Just remember to add fluid during the bleeding. You'd hate having to start over because you sucked it dry in the middle of the bleeding process, re-introducing air into the system.

NOTE 4: Read the Oldsmobile Chassis Service manual closely regarding torque specs. Some of the bolt torque specs require that the full weight of the car be on the wheels when the bolts are torqued. The upper and lower control arm bolts are two of them but there are others. If you tighten them with the wheels hanging in the air, the bushings will be squished tight (pre-loaded) so that when you let the car down, the control arms won't move to their natural position. It may sit too high as a result, not to mention adversely affecting the front-end alignment.

Back to the top

Converting drum brake spindles to accept disc brakes

You might have heard that drum spindles can be modified for disc use. While this has been done by many people successfully, spending the $200-$400 on getting the correct parts from a donor car instead  is still the best route. However, just for general knowledge I'm including the information you need to do this. I should also mention that I've not tried this, so proceed at your own risk.

Supposedly all that's involved is milling .750 off the pad at the top of the spindle near the upper ball joint where the spring anchor was bolted into. You'll also need to tap out the hole (the spring anchor hole becomes the caliper bracket hole) to full depth.

Back to the top

Back Home

Swapping B-body brakes onto 
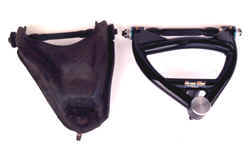
your A-body

While it is physically possible to put the '73-'79 A-body spindles on the '64-'72 A-body cars, this is NOT a bolt-in swap. The ball joint size and taper was changed, which means that you must use the '73-up ball joints. This will require machining the body of the lower ball joints to fit into the early control arms. Since the '73-'79 spindles are also taller than the early spindles it will require custom fabricated arms sold by Hotchkis or Global West. (See picture below.) Finally, the '73-'79 spindles will also require the later outer tie rod ends, again to match the different taper.

Stock arm and Global West's CNR-40
Stock upper control arm
and Global West's CNR-40

The bottom line is that after all this work, you will still only end up with the same size discs as if you had used the '67-'72 brakes. It would make more sense to get your hands on a set of B-body spindles with the 11" or 12" rotors. The work to install them is the same, but the brakes are bigger. (You will still need to get the custom upper a-arms mentioned above.)

Using stock A-body upper control arms with the taller '73-up B-body spindles will not work properly. Suspension geometry will be off and alignment will require over 1-1/4 inches of shims (if you're lucky) with probable steering column or exhaust interference.

However, in addition to the larger brakes, there are some advantages:

  • The upper ball joint is moved back to allow for higher caster alignment settings. Caster improves high speed stability and road feel. Caster also improves corner entry.

  • By using taller spindles and shorter upper control arms, camber curves are directly affected. The tire stays flatter on the road surface. This improves handling through the corners dramatically.

  • Tire life is improved because the tire remains flatter on the pavement.
  • Front ride height will drop 1-inch because of the taller spindle and lower ball joint combination. This lowers the center of gravity and improves vehicle appearance without sacrificing suspension travel. This combination also lowers the front roll center providing a more favorable roll axis.

The following donor cars provide 11-inch disc brake spindles:

  • Apollo 1975
  • GMC Sprint 1973-1977
  • Pontiac Full Size 1977-1981
  • Buick Full Size 1977-1981
  • Grand Prix 1973-1977
  • Pontiac Lemans 1973-1977
  • Buick Century 1973-1977
  • Monte Carlo 1973-1977
  • Riviera 1977-1978
  • Camaro 1970-1981
  • Nova 1974-1979
  • Seville 1976
  • Chevelle 1973-1977
  • Olds Cutlass 1973-1979
  • Skylark 1975-1979
  • Chevy Full Size 1977-1981
  • Omega 1975-1979
  • Ventura 1975-1977
  • Firebird 1970-1981
  • Phoenix 1977-1979

The following donor cars provide 12-inch disc brake spindles:

  • '77-94 Buick Full Size- Le Sabre Wagon / Electra Wagon
  • '77-'92 Olds Delta 88, Delta 88 Wagon and Olds 98
  • '77-'84 Cadillac Fleetwood and Deville
  • '85-'94 Cadillac Brougham and Fleetwood
  • '77-'86 Pontiac Full-Size Bonneville, Catalina, Grandville
  • '77-'96 Chevy Full Size Caprice, Impala, Belair, Biscayne

     Important: There are two different types of 12-inch disc brake spindles. One version uses a small outer bearing measuring .750. The second type uses a larger outer bearing measuring .850. Use the large diameter outer bearing spindle.
     Use 12-inch rotors off a 1988-1992 1LE Camaro/Firebird GM part #GM 18016035. 1LE rotors have the correct bolt pattern but use 12mm studs rather than 7/16 studs. You need to change the studs over to 7/16. The wheel stud holes in the rotor will have to be opened up slightly in order to convert to 7/16 studs. A 35/64 drill bit will do the job. A conversion kit is available to do this procedure. Be sure to order inner and outer bearings as well as the grease seals for both sides.
     The brake caliper to use is off of a '70-'76 Camaro/Firebird. These calipers are the right width for 1LE rotors. Use an 1-1/8 master cylinder with power brakes and a 1-inch master for manual. If you have front drum brakes and converting to disc, you will need a proportioning valve. Use an adjustable proportioning valve rather than a standard valve.  If you already have discs and upgrading to larger brakes for the handling kit, your original proportioning valve will work.

Back to the top

Back Home

Aftermarket Brake Kits/Components Sources

Other Brake-related Information

  • BRAKES - excellent resource page with links to MANY different brake-related topics, from bleeding the system to making your own brake-bleeding tools, brake system flushing, ABS, troubleshooting, etc.

Back to the top

Back Home

Disc Brake Troubleshooting

Hard pedal with poor stopping power  - usually indicates 1) a faulty power booster or 2) wrong master cylinder. You'll see the wrong master cylinder more on '70s cars because they were interchanging Moraine and Bendix design master cylinders/power boosters on all car lines. The brake pedal pushrod recess is deeper on one type than on the other, and if you put one type master cylinder on the other type booster, one of two things will happen. Either the hard pedal/weak braking you describe, or the pedal goes to the floor and doesn't build up, with corresponding scary brakes. Could possibly be a stuck metering block if your car has the dual master cylinder. Stuck wheel cylinders will cause this too.

I have seen several cars with the exessive pedal pressure problem being due to a disc-brake master cylinder put on a car with drum brakes. A brake system has to have a certain size bore in the master cylinder to properly work a wheel cylinder (whether it is disc or drum). Disc brake master cylinders are different from drum brake master cylinders because the capacity of drum brake wheel cylinders is different (smaller) than a disk brake caliper(larger). Telling the difference between the two is easy. The front reservoir of a disc-brake master cylinder is larger than the rear reservoir. The reservoirs on a drum-brake master cylinder are the same size.

Back to the top

Back Home

Should You Convert to Rear Disc Brakes?

What are some of the advantages to converting to rear disc brakes over keeping drum brakes?

Pros:
- Better braking ability
- Looks a lot better if you have open rims
- It's a nice and functional mod to add a little more technology to our classics
- Maintenance is easier
- Not as 'grabby' as drum brakes, thus less tendancy to lock up
- C-Clip eliminators are not needed or required with rear disc brakes (when using a Chevy rearend)

Cons:
- Can be expensive
- Fabrication may be required
- Emergency brake may no longer be functional
- Requires a new master cylinder and proportioning valve
- Brake lines require modification

In my opinion for the average street-driven cars it is not cost effective, since the front brakes do 80% of the stopping anyway. For the weekend warrior, a stock disk/drum system is fine. Discs do offer better braking capability, but unless you have 11" or 12" front brakes retrofit they can't really offer much. You would also need some big rubber and stiff performance handling springs and shocks (to minimize front-end dive under hard braking conditions) to prevent them from locking up. Don't get me wrong - they look nice and are easy to maintain, but the parking brake must be made operational which is sometimes a big job depending upon which calipers you use. Another bad thing is most rear disc setups will push the wheels out some, though normally only about 1/4" or so.. This might make your tires rub, or mean you will have to get more backspace if you get new wheels. Also, drums can run "0" drag, which is basically only important on race cars. but the discs will be far less prone to fade...so, if you are doing alot of hills, going fast/slowing down fast or on the brakes a lot, you'd probably see the difference.

Another thing to consider in the disc vs. drum argument is the fact that discs have the ability to disipate heat faster than drums, since the friction surface of a disc is exposed to air flow while a drum's is enclosed within the housing. This means that even if a drum car could stop in an equal distance to a disc car, subsequent stops might cause the drum car's brakes to fade and increase stopping distances.

Have you considered simply upgrading your rear drums to a larger size? Then you could keep all your existing setup and just swap out the rear axle stuff and be done. You then get better rear braking, and better heat dissipation without the major hassles of the rear disks. This can easily be done by simply using the backing plates from a '76 or '77 Monte Carlo or some B-bodies, and everything else bought new. I paid $5 ea for the backing plates and they came with decent wheel cylinders. Springs kit and cylinder rebuild kit was about $12 a side. Pads were approx $25 and the drums about $35 ea. So for about $130, I got the larger 11" drum brakes complete and there was no messing with prop valves, master cylinder, new lines, etc. And YES, I did notice a difference! Stiffer springs, poly bushings, and all the other goodies to keep weight transfer minimized will make a difference in this department as well. The 11" drums give you quite a bit more surface area contact, so that helps stopping and dissipates heat better.

Four wheel drum brakes offer a weight savings over regular disc brakes and will work fine in stopping 10 and 11 second 120+ mph drag cars. Plus, as mentioned, drum brakes can be set to provide "0" drag - which is by design not possible on disc brakes. However, racers who go much quicker/faster than that on the strip prefer disc brakes because faster speeds will generate more heat that is better suited to disc brakes. (For further weight savings on your Cutlass you can install the aluminum rear drums from the G-bodies or S-10 pickup of the '80's and front aluminum drums from a late '60's Buick Gran Sport.)


Back Home

Back to the top
| Home |
| My Personal Project - Photo Galleries | Updates/Journal | Sign My Guestbook | View My Guestbook |
| 1967 Specifications - Model ID | Product Specs | General Specs | Engine | Tune-up | Torque |
| Vintage Ads | Vintage Road Tests | Technical How-To's | Owner's Registry | Messageboard | Links |

line.gif (839 bytes)

Want to link to this site? Please use this banner.
OLDSmobility.com - The 1967 Olds Cutlass and 442 Resource

The correct URL for this website is http://www.OLDSmobility.com/)
For questions, comments or suggestions, please e-mail me.
All content on this site is © 1999-2008 by OLDSmobility.com/Project 442 Clone, unless otherwise noted. 
All rights reserved.
This page last modified on August 26, 2001.