 |
If musclecars could talk, they'd probably complain of a whole
range of abuses that have been dealt them over the years by various owners. After all,
what were high-powered chariots for, if not for standing on the accelerator just for
kicks?
Since the first GTO took to the streets in late '63, musclecars have been through the
standard used-car depreciation cycle, and then the gas crisis of the '70s, when you
couldn't give 'em away. Now, of course, they're big-time collectibles, but they've been
through plenty of careless hands in the interim. Lots of original-number engines have been
yanked, and gearboxes grenaded, but what about the limited-slip differential many
musclecars came equipped with?
If a differential breaks, that's one thing. It's simply replaced, sometimes with a
non-Posi unit or, as was common, with a 12-bolt Chevy assembly (no longer so fashionable
now that originality counts). But most often, the original rear end still works, though
its Posi function has long since faded. Today, rear-end rebuilders often find
nonfunctioning Posi units that prove to be badly damaged when opened up.
We asked Larry Woltzen of California Differential in Fremont, Calif., to share with us his
approach to identifying, disassembling, inspecting, and rebuilding the 10-bolt
"Saf-T-Track" Posi rear found in lots of 1964-72 GTOs and many other GM
A-bodies. All '64-72 A-body rears interchange, except for the U-joints (the'71-72 Skylark
pinion yoke is 1 inch farther forward, requiring driveshaft shortening).
One thing Larry won't be telling us is his trade secret: how to rebuild the cone-type GTO
Posi unit, which General Motors says can't be rebuilt. If we let this secret out of the
bag (and we can't, since we don't know it), Larry would lose what he terms a
"competitive edge." So we'll settle for leaving the room when he works his cone
magic. That should make no difference to most musclecar owners, since rebuilding of the
case (the center section) should be done, as a rule, by a qualified shop, rather than by
the owner.
What Larry will take us through will apply to owners who wish to inspect their units, or
identify junkyard finds, or rebuild their units after the case has been sent out for a
professional rebuild. You'll also learn some tips to help you make sure you get the right
rebuild from any shop that does your work.
We'd like to point out that your first step in rear-end work is to have a copy on hand of
the Pontiac GTO Restoration Guide, by Paul Zazarine and Chuck Roberts. On pages 307-313
you'll find a great deal of information on GTO axles. Our purpose here is not to reiterate
that information, but to add to it by talking with a man who rebuilds these units day in
and day out, and who, therefore, has much to tell us. Let's join Larry as he explains his
identification and inspection procedures.
Identification

The first step in identification is to determine that the rear is a l0-bolt. A
lot of these units were removed in favor of Chevy 12-bolts over the years. Look at the
rear end cover; it should look like the one in Figure 1. "the 10-bolt was used in all
1964 through 1972 GTOs, except for the 1970-72 455 cars," says Larry. The same
l0-bolt rear was used in 1964-67 Buick A-bodies as well, and in 1964-66 Olds
A-bodies."
The next step is to determine whether you've got a "narrow" (1964-65) or
"wide" (1966-72) l0-bolt. In '66, the l0-bolt Pontiac got an inch wider, meaning
you can't swap axle shafts between the two. "The way we identify them here quickly is
what we call the two-finger method, rather than measuring, which is especially troublesome
- particularly under a car," Larry explains. "Place your first two fingers
between the inboard side of the brake backing plate mounting flange and the outboard side
of the lower control arm bracket. As the photo (Figure 2) shows, if two fingers will fit
in there, you have the '66-72 wide rear end. In the narrow rear, not even the fingers of a
teenage girl will fit in that area. It's fully a half-inch narrower space. That's how we
identify them quickly."
How do you find out if a particular rear is a Posi unit? First, look for a Posi tag held
on by a cover plate bolt (Figure 3). "This tag was put on all rear ends equipped with
a Positive-traction type of differential case at the factory. If your rear end is a Posi
type, it should have this tag on it. However, it could have been taken off and not put
back on, and usually is. When people over the years have pulled the cover plate to drain
the rear end and so forth, they don't bother to put the tag back. So checking for the tag
is just a first step in the identifying process."
You can also look on the axle housing for code numbers; refer to the GTO Restoration Guide
for these. Many cars also had a sticker on the left rear brake drum, and if you find one
of these intact, the car most likely has the original axle.
Larry says another way to determine whether you have a Posi or a non-Posi rear is to jack
the rear wheels off the ground, with the parking brake off and the car in neutral. Be sure
to block the front wheels. With both wheels off the ground, have a helper hold one wheel
still while you try to turn the other. If it's a Posi, you should not be able to turn it.
Two exceptions: If the Posi unit is specially set up with no preload springs, you'll be
able to turn the tire; or, if the Posi unit is worn out, you'll be able to turn it. If you
have an "open" (non-Posi) rear, you'll be able to turn the wheel easily while the
other is held stationary.
If you don't have a tag, and you're unsure whether or not you have a worn or set-up Posi,
the next step is to remove the cover plate and look at the case. Fluid will drain, so have
a pan under the rear. The Posi case is noticeably different, as can be seen in Figure 4.
The unit on the left is a Posi; on the right is an open case. "Obvious differences
between the two: the large window in the unit on the right, and the overall additional
metal and strength involved in the Posi unit," Larry points out. This method, he
adds, is the surest way to know you've got a Posi.
While you're looking at the case, let's find out what gear ratio you have. Figure 5 shows
a ring gear. "Normally, this ring gear would be bolted to a differential case,"
says Larry. "However, the numbers in the photo are what's important. Once the
differential cover is off, you'll be able to tell for certain which gear ratio you have in
your GTO by rotating the ring gear until you come up with these stamped numbers. These
numbers tell us several things; what we're trying to determine here is the ratio. The
number of teeth on the ring gear divided by the number of teeth on the pinion gear gives
us the relative gear ratio between the two. These numbers are stamped on the edge of the
ring gear. In the photo, what we have is a 39 10. Divide the larger number by the smaller
number; in this case, we have a 39 divided by 10, or a 3.90 ring-and-pinion ratio.
"Other numbers on the ring gear edge that may be of interest are the numbers to the
right of the GM logo marking. These numbers always indicate the month of the year and the
last two digits of the year that the gearset was manufactured in the GM plant. In this
example, we have a gear that was made in February of 1968; undoubtedly this gearset would
have been installed in a 1968 model year vehicle."
You can also determine your gear ratio without removing the cover plate. For a Posi car,
block the front wheels and raise the rear on a floor jack. With tape, mark the wheel and
the wheel well opening. Also mark the driveshaft with tape. Rotate the tire and count the
number of times the driveshaft turns to one revolution of the tire. For a non-Posi, keep
the car on the ground. Mark the tire, wheel well, and driveshaft and carefully roll the
car forward or backward while keeping an eye on the driveshaft. If the shaft turns about
3-1/2 times to one turn of the tire, for example, you've got a 3.55 ratio.
"If you're going to do any work on the rear end," Larry says, "get it out
of the car. A rear can be rebuilt in the car, but I don't recommend trying it. You'll wish
you had pulled it out long before you finish rebuilding it."
The procedures in this article cover disassembly, inspection, and reassembly of a GTO
rear. It is assumed that you're not making any changes, such as gear ratio, converting a
non-Posi to a Posi, etc. It's also assumed that the rear was set up correctly at the
factory, which may or may not be the actual situation.
Well go through the process of installing all new bearings, seals, and gaskets; inspecting
the Posi unit; checking for signs of abuse, extreme wear, metal fatigue, and lack of
maintenance; and correctly reassembling the rear end. Shim changes should not be required
if the original ring and pinion gears and differential case are reused. Caution: Be sure
to reinstall all adjusting shims in their original positions.
Disassembly
Figure 6 shows the differential housing after disassembly, with the side bearing
caps loosely reinstalled. Before removing these caps, it is essential that they be marked
for position so they can be reassembled exactly as they came apart, just like engine main
bearing caps. "this is absolutely critical," Larry warns. "these caps
cannot be turned upside down or reversed left to right. They must go back exactly as they
were before they were removed."
You may need a slide-hammer type of puller on 1964 to late-'69 cars. The outer race of the
wheel bearing may be stuck in the housing because of rust.
After removing the large nut that holds the pinion gear in the front yoke (1-1/8 inch for
1964-65; 1-1/4 inch on '66-'72), do not beat on the threaded end of the pinion gear with a
hammer. Instead, use a soft metal (brass or aluminum) drift so you don't deform the
threads.
Remove all bearing races and seals with a length of pipe, drifts, or punches, tapping
first one side and then the other. The differential case side bearing, inner cones, and
pinion gear bearing will all have to be pressed to be removed, as will the rear wheel
bearings on the axle shafts.
For most of the rebuild, you must have a factory shop manual at hand. Novices may have a
little trouble removing bearing races with punches; you need to punch from side to side,
instead of trying to hammer on just one side. Otherwise, the shop manual is a good basic
guide.
Inspection
The first thing you do with a disassembled rear is to clean everything in
solvent, then hot-tank everything, and if you want a show-quality finish, bead-blast all
parts that will be painted. But before you go that far, let's inspect those nice clean
parts.
Whenever Larry does a rear, he's careful to inspect the housing for cracks and
straightness. "A lot of these musclecars have been subjected to high torque, abusive
driving, physical damage due to collision, sliding into curbs, and so forth, and now have
the housings out of alignment. Such housings must be realigned or straightened. We see
this kind of damage in about 50 percent of many types of musclecars now, so it's necessary
to check this when you have the housing out of the car and disassembled. The straightening
is rather specialized work, but a rough check can be done as shown (Figure 7). This check
will tell you if the edges of the tubes are parallel; it will not tell you which tube is
bent if there is a difference in the dimensions. Measure the distance between the
straightedges both in front of and behind the axle housing. If it's within l/8 inch of
being equal, the housing should be straight. Be sure to check both directions."
Figure 8 shows the key parts to inspect inside your Posi case: the Posi cones (one is
shown here at upper right) and the pinion gears and pinion shaft. These parts will tell
you whether or not you need a rebuild. The cone is the clutching part of the Posi - the
part that locks up and lets go.
"The cone shown here indicates trouble for two reasons," Larry points out.
"First, the flutes or spirals on the side of the cone, which actually do the locking
up, are severely scored. This will impair locking-up capability. Second, the round shiny
area on the outboard end (top) of the cone is a definite indication that this unit is not
locking up as it should. The only time the end will be shiny like that is when the cone
has bottomed out on the floor of the case half. That always results in slippage of the
Posi unit. Anybody who notices that in a teardown of a Posi unit will definitely need to
have the unit rebuilt.
"With the other two components, what we're showing here is, on the shaft with the
gear attached, the gear is not only physically damaged, but it's also practically welded
to the shaft. It can't be removed because it has spun on the shaft and welded itself fast.
The other gear was removed, but it's deeply scored in its bore. In a Posi-type
differential, the little gears, which ride on this shaft, would normally turn relative to
the shaft only when the car is going around a corner. However, if the Posi unit is
slipping, and not holding as it should, these gears can spin at a tremendous rate of speed
on that shaft, and in a matter of seconds those gears will wipe their lubricant off and
seize to the shaft, or at least score it. The only time they would turn at that tremendous
rate of speed would be when one tire is turning at a rate of speed far in excess of the
other tire - in other words, when the car is sitting there burning the right tire and the
other is sitting still. That kind of thing would happen only when the Posi is not doing
its job.
What Larry's describing here is the late-'70s teenager who's bought a cheap, used GTO and
feels the need to impress his classmates by burning out in the high school parking lot.
His nonfunctioning Posi unit is badly damaged in seconds, and he probably repeats this
dozens of times.
Even if your gears show no physical signs of abuse, while they're out you should have all
of them Magnafluxed. Larry prefers to use GM ring and pinion gears whenever he can, but
only after he's had them Magnafluxed. As far as the differential case is concerned,
you'll
need to check the runout on the ring gear flange, as well as the pilot diameter. Check for
scoring of the cones and taper bore, as well as of the spider gear shaft and gear bore, as
mentioned above, and look to see if you might have a spun bearing on the end of the case,
especially on the left side.
Check the axle bearings by rotating the outer race to check for roughness; also check for
a tight press fit of the bearing on this shaft.
Figure 9 shows how to check the axle flange for straightness. "These flanges often
are bent; kids have run these cars sideways into curbs and what have you, and the axles
are wobbling when they turn. By putting the axle shah in a set of V-blocks and putting a
dial indicator up next to the flange, and rotating the axle shaft, we can determine how
much wobble we have st the flange. Maximum allowable runout is 0.007 inch. Straightening a
bent shaft is out of the question; if you want a smooth-riding car, get a different
shaft."
You'll need to check the fit of the differential side bearing outer races in the carrier.
First, put the races in the carrier and bolt the caps on, but just snug the bolts down.
You should get a tight enough fit that you can't turn the race in the bore. If the race
will turn, you'll need to have the caps refitted (surfaced) so they'll hold the races tight
and keep them from spinning.
You should also check the U-joint yoke for deep scoring on the seal surface, as well as
any damage to the area where the U-joint attaches.
Check your axle shafts for proper length, too, especially if you plan to use replacements.
Figure 11 shows the two different axle shafts that are used with the wide (left) and
narrow (right) GTO rears. "You can't put the long axle in the early, narrow housing,
and vice verse," Larry warns. "You've got problems if you try to do either one,
although some people try to do it - especially the short axle in the wide housing. That
causes their Posi unit to fail immediately. So you've got to be careful." On the long
shaft, a measurement taken from the axle flange to the end of the shaft as shown will be
about 29-5/16 inches; on the early axle, it will be about a half-inch less. Note that the
bearing on the long shaft is only for GTOs up until late 1969, when a new type of bearing
was introduced.
Reassembly
For most of the bearings, including the axle shaft bearings, case bearings, and
pinion gear bearings, you'll need to have press work done. Figure 10 shows a bearing being
pressed onto a Posi case. "this is the best way to put new bearings on these
components," Larry notes. "It's difficult to do otherwise. There are 2 to 6 tons
involved with this press work. A local machine shop will do it for you." Use Loctite,
and don't forget to install the shim behind the rear pinion gear bearing.
In Figure 12 we see the pinion gear, the rear pinion bearing, and a bottle of Loctite.
Says Larry: "If you press these bearings on any of these components in this rear end
the way the factory suggests you do it - that is, with just ordinary lube - down the road,
40,000 to 50,000 miles, these bearings all start spinning on these shafts. They shouldn't
do that, even though they're pressed on there with several tons; it's just not enough with
the forces involved to keep them from spinning. So what we use is this premium grade of
Loctite, No. 680. It's advertised as two-ton press-apart Loctite. We think it works pretty
well; it appears to prevent this kind of spinning. When bearings spin on these surfaces,
they damage the parts, and we haven't seen this happen with units that we assemble this
way. We recommend that this be used on all surfaces that have a bearing pressed onto them
- both the inner diameter of the bearing, and the surface onto which it's pressed. It
absolutely should be done."
The pinion gear should be pressed into the housing. The original crush sleeve should be
okay. Use Permatex on the inside diameter of the yoke, in the forward 1/4 inch inside
diameter. Trap the front bearing inner cone assembly with the pinion seal, then push the
pinion gear through the front bearing and yoke. Tighten the nut as necessary until 15 to
20 inch-pounds of turning torque is obtained. Spin the pinion three or four times to seat
the bearing before taking your final torque reading.
In Figure 13, Larry checks the preload on the pinion bearings with an inch-pound torque
wrench. "We're not using this wrench to tighten the nut - only to turn the assembly.
This is a very, very critical part of rebuilding a rear end. This is where 95 percent of
the average mechanics go wrong. Applying too much bearing preload to these bearings causes
them to burn out in a short period of time. In this case, we're looking for 15 to 20
inch-pounds of turning torque to rotate the pinion through its bearings. The differential
case has not been installed yet."
Now you are ready to install the case. Replace the side shims in their original positions,
and then install the caps on the side bearings in the same position as they were before
disassembly. Torque the caps down to 70 lb.-ft. The turning torque on the pinion nut
should now be 20 to 25 inch-pounds.
Apply GM No. 1052351 gear marking compound to the ring gear, and check the ring gear to
pinion tooth contact pattern. Install the housing tube outer axle seals, if used (1964 to
late'69 rears). Finally, install the cover plate and fill the differential with lube and a
bottle of GM Posi additive No. 1052358.
Properly rebuilt, your new rear should last 100,000 miles, unless you're still trying to
impress the high schoolers. Nevertheless, if California Differential has rebuilt your
differential, you've got a 50,000-mile warranty on it. Knock 'em dead, kid.
For information about the products and services offered by California Differential, write
to Larry Woltzen at California Differential, 44255 Fremont Blvd.-I, Fremont, CA 94538, or
call him at 415-490-6483. Larry is one of the few people in the country who are real
experts at this kind of work for musclecars. Because of the increasing scarcity of 10-bolt
Posi parts, the cost of such a restoration is now increasing steadily. Larry utilizes the
services of several people who scour the nation's junkyards for musclecar differentials,
so he usually has a good supply of parts on hand.
|
OLDSmobility.com Related Links
|
|
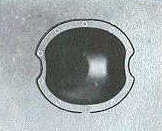
Figure 1. Cover plate for the GM 10-bolt differential (Olds/Pontiac).
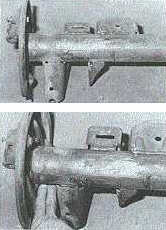
Figure 2. Two fingers will fit in this space on a wide version of the 10-bolt rear,
installed in 1966 and later GTOs.
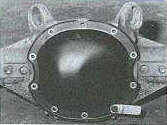
Figure 3. Very original cars will have this tag on the Saf-T-Trac cover plate.
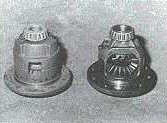
Figure 4. The limited-slip case (left) has much more metal than the "open" rear
on the right.
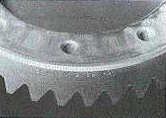
Figure 5. Divide the larger number (39) by the smaller number (10) on the ring gear to
determine the gear ratio. For this set, it's 3.90:1.
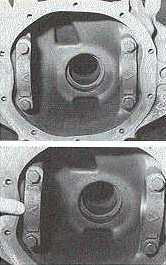
Figure 6. Be sure to mark the caps in their original position before removing them. Don't
get them mixed up; mark left and right caps, and the top of both. They MUST be returned to
their original position.
Figure 7. Using two rules and a tape measure, check the tubes for straightness.
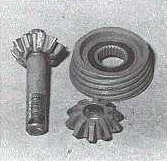
Figure 8. Here you can see some of the damage you can find when you disassemble a rear.
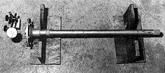
Figure 9. Rotate the axle shafts in V-blocks and check the flanges for straightness with a
dial indicator.
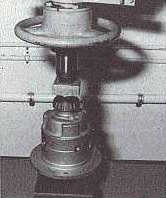
Figure 10. A local machine shop will be glad to press your bearings on. Don't try to do it
without a press.
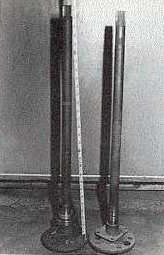
Figure 11. Early (right) and later (left) axle shafts. You can't interchange them.
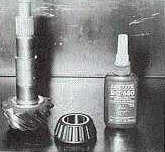
Figure 12. Use Loctite retaining compound in your bearings to keep them from spinning
after about 50,000 miles.
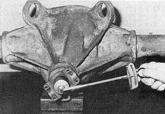
Figure 13. Set the preload on the pinion bearings with an inch-pound torque wrench. You
should get a reading of 15 to 20 lb.-inches when the pinion begins to rotate through the
bearings. After installing the case and torquing down the side bearing caps, it should
take 20 to 25 lb.-inches to turn the pinion.
|
|

