Project 442 Clone - Your 1967 Olds Cutlass / 442 Headquarters


How to Install
a '67 442 RallyPac

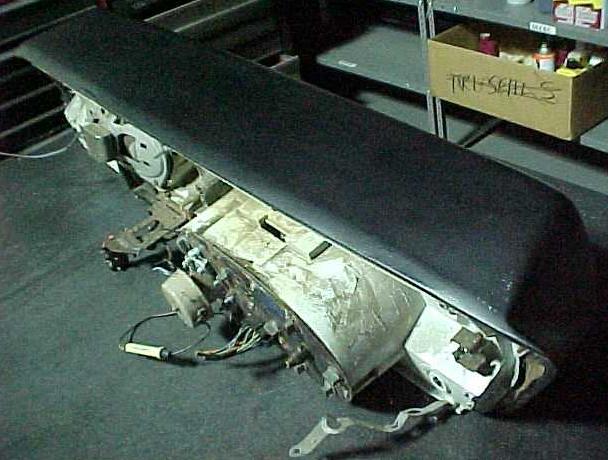
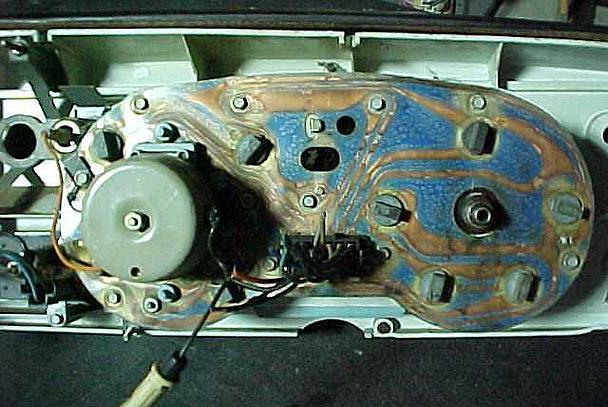
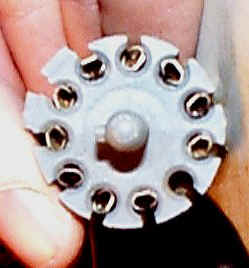
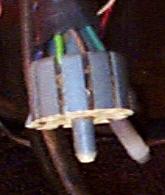
This dash assembly was received via UPS on February 02, 2001. The first two pictures were sent to me by the seller beforehand. This will be installed in my '67 Cutlass Supreme. I plan to spend the next few weeks or so cleaning this up and researching how the hell to wire it up!

UNDER CONSTRUCTION!!

NOTE: This page is just being slapped together as a way of consolidating information for this conversion. This URL is not advertised on OLDSmobility.com yet...but will be as soon as all the details are worked out. A BIG thank-you to all who are contributing!

UPDATE: February 14, 2003  -- This page was originally begun two years ago when I first received the parts, but about halfway through the page design, my computer crashed and I lost a lot of the info, since I hadn't backed it up. What you see here is what I HAD backed up prior to the hard drive crash. I've got notes jotted down here and there that I have to dig out, so stay tuned for the updates. Getting this hooked up is not an immediate concern, however. It'll be a little while before the car will be to the point will it will be needed.


Picture 1: As you can see in this photograph, all wires coming into the back of the dash assembly have been snipped. The dashpad is in fantastic shape...no cracks and still pretty pliable. Along the right side of this picture you can see the ground strap for the light and wiper switches sticking out. The plastic stud that this strap should be bolted to along the top of assembly is missing...so I will have to take a look at my Cutlass dash, to see if the plastic housing is the same. If so, I'll be swapping the gauge cluster to the new plastic housing and will use this dashpad.


Picture 2: The circuit board on the backside of the Rally Pac appears to be in one piece and useable, but it's pretty wavy. I'll have to take a better look one I get this torn apart and cleaned up. I might be OK, though. We'll see.


Picture 3: The circuit board on the backside of the Rally Pac
The inline fuse connector (evident in Pictures 2 and 3 above) is the tach feed.


This is the Rally Pac connector which came with the dash assembly.
The 12 wires are numbered on the connector and are as follows:

1 - Navy blue (no stripe)

2 - Black w/light blue stripe

3 - Grey (no stripe)

4 - Orange (no stripe)

5 - Black (no stripe)

6 - Navy blue w/white stripe

7 - Black w/white stripe

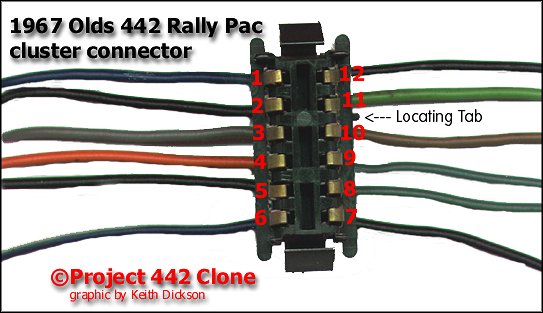
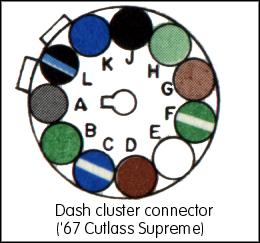
8 - Dark Green (no stripe)

9 - Dark Green (white stripe)

10 - Brown (no stripe)

11 - Light Green (no stripe)

12 - Black (no stripe)

NOTE: Locating Tab should be in the up position

Back Home

 
This is the dash cluster connector for my '67 Cutlass Supreme.
I checked all wires, and they are identical to the diagram below.


V-8 and L-6
33, 34, 35, 36, 38 Series
(all wires are 18 gage unless specified)
Source: 1967 Oldsmobile Chassis Service Manual

Letter Identifying Color Description
A Grey (no stripe) Instrument lamps
B Dark green (no stripe) Temperature warning lamp
C Dark blue -(white stripe) Oil pressure warning lamp
D Brown (no stripe) Alternator warning lamp
E NONE NONE
F Dark Green (white stripe)
(20 gage)
Alt, temp, oil warning lamps & fuel gauge
G Tan (no stripe) Fuel gauge
H Light green (no stripe) High-beam indicator lamp
J Black (no stripe) GROUND
K Dark blue (no stripe) Right turn signal indicator lamp
L Black (blue stripe) Left turn signal indicator lamp

Back Home

Note: According to the 1967 Oldsmobile Chassis Service Manual's wiring diagrams, the "F" wire splits at the harness end and goes to numerous places: the parking brake light switch, the fusebox, and the "starter and back-up light switch". (What is the "starter and back-up light switch"?) At the dash, it connects to the alt, temp and oil warning lamps & fuel gauge. What does this wire do?

Back to the top

OK....I started matching up the wires. To check each Rally Pac connection, I followed the circuit board connections. The following table seems to be accurate...as far as comparing it with the C/S harness connector.

Cutlass Supreme harness Description 442 Rally Pac cluster connector
Dark blue (no stripe) -K Right Turn Signal Indicator lamp 1 - Dark blue (no stripe)
Black (light blue stripe) - L Left Turn Signal Indicator lamp 2 - Black (light blue stripe)
Grey (no stripe) - A Dash lights 3 - Grey (no stripe)

N/A

Clock 4 - Orange (no stripe)
  (1) 5 - Black (no stripe)
Dark blue (white stripe) - C Oil pressure gauge 6 - Dark blue (white stripe)
  (1) 7 - Black (white stripe)
Dark green (no stripe) - B Temperature gauge 8 - Dark Green (no stripe)
Dark Green (white stripe) - F Fuel gauge/oil pressure
(splits apart on circuit board)
9 - Dark Green (white stripe)
Tan (no stripe) - G Fuel gauge 10 - Brown (no stripe)
Light Green (no stripe) - H High beam indicator 11 - Light Green (no stripe)
Black (no stripe) - J GROUND 12 - Black (no stripe)

Notes:
(1) On the Rally Pac circuit board, No. 5 and No. 7 go to the amp gauge. Solid black to "Discharge" side, black w/white stripe to "Charge" side.

NOTES: Is this looking right so far? Actually, it appears that the existing dash wiring harness would work, with the exception of the ammeter wiring. Could this simply be added to the existing dash harness? If so, how would the ammeter need to be wired up? Or would it be best to simply find the correct harness? If so, who would have the Rally Pac dash harness?

I decided to check and see if the unused "D" (amp gauge wire) in the C/S dash harness could be used as one of the new ammeter wires. The wiring diagrams show the "D" in the C/S dash harness going to the Engine and Dash connector (on the firewall) and then onto the voltage regulator. However, at that Engine/Dash connector, a 10-ohm resistor wire (connecting to the Acc side of the ignition switch) is tied into the "D" wire. Would this affect ammeter? If using the C/S harness, I would guess that two completely new wires would have to be run from the Rally Pac connector out to ???

Curt says: "One of those wires for the ammeter goes to the horn relay on the fenderwell with the battery cables...the other (I think) ties into the red wire on the regulator."

OK...so here's the official question list:

    1. Can I get away with using my Cutlass Supreme dash harness and NOT getting an original (or reproduction) Rally Pac dash harness, by simply changing the wires connection tabs from my C/S harness to accommodate the square type for the Rally Pac connector as listed in the above table?

    2. If so (and my deductions in the above table are correct), the orange wire from the Rally Pac dash connector would be have to be extended down to the fusebox where it would get wired in to a constant 12V source?

    3. Again, if I CAN use my existing harness as listed above, I would have to add two wires to the harness which would power the Rally Pac's ammeter. There are currently two unused 'terminal stations' at the front engine harness bulkhead on the firewall. I would wire new prong connectors into the bulkhead, and then continue extending the two wires out to the the engine hookups, adding the two wires to an existing branch of the engine harness. SO....where do they connect at the engine? Can someone verify what Curt suspects; that the two wires go to the red wire on the voltage regulator and the horn relay connection on the fenderwell? Which wire gets connected to the Charge side of the ammeter and which wire goes to the Discharge side?

    4. What gauge of wire do I use on the two new ammeter gauge circuit?

    5. What about the sending units? Someone mentioned in an e-mail I might have to, but wasn't sure. Would I need to replace the temp, water temp and oil pressure sending units? If so, does anyone have the appropriate part numbers and/or source? And what are the differences between the idiot-light sending units and the gauge-type sending units?

    6. What size of fuse needs to be installed in the tach feed inline fuse connection? And what gauge wire do I use to extend the tach feed wire to the coil?

Back Home

RALLY PAC INSTALLATION NOTES

(The following is taken from e-mails posted regarding this conversion. They are posted here at the present time as simply a way of comparing information. I will be combining everything received at a later time, as all relevant information is figured out. Thanks to all who've e-mailed me so far!!)

MIKE C. - You should be able to pull the pins from the connectors and switch them ONE AT A TIME. I would not splice them. First pull the square connector off the cluster, if the pins are round you are probably good to go. I would first figure out how to pull them (the 3 inch leads) from the square connector (only pull ONE). its usually a slit on the inside face that a small flat head will go into to release the hold in tab for that cable. Pull one cable from the square connector, find the respective color cable on your existing harness, and pull that one wire out and clip it in the square one where you just removed one. Work your way around the square connector until you are finished.

Is there a difference in harness other than square/round end? It might only be the tach lead. You will discover what color it is when you have no match for it. I have re-wrapped my old harnesses with great success in the past. Just lay it out on a floor and as you unwrap it, rubber-band or tape sections in front and behind where leads drop out so you can re-wrap it properly. At that point it would be wise to have some "lead in wire" (available at any local electric supply) in the correct color to add to your harness. I hope you are handy with a soldering iron, to do it good, solder the old connector (from your 3 inch tach lead) on the new lead and then wrap it up with the old harness. if you clean up the ends with acetone, first the color will come back to bright and your harness will look brand new.

You need to understand how the cables unsnap from their plastic ends so you can remove them and clean/replace at will. Also helpful for the soldering of ends on if any are loose or barely hanging on (will melt plastic if you don't). Most all restoration catalogs sell the harness tape (just like electrical tape but with NO sticky side). You will need to get the ends for the tach lead at the firewall connector, unless you just run the tach lead straight through that connector and gunk over it (no one would be the wiser until they tried to remove the engine harness- surprise!.) They are always plugged with gunk, so you'll need a tiny screwdriver or the like to poke through a slot. I have no clue which outlet the Rally tach lead goes through, but they are numbered so anyone with one already might be able to tell you. I think the numbers are inside, so you might have to remove the one nut bolt that holds the engine side harness on, then pull the harness off (recommended anyway, the gunk is usually only on the outside end) The leads for the temp and oil pressure sending units (engine side) are the same on the rally pack car, but the factory used an extension to the oil pressure one. The sending units are also different, and have a variable ohm reading on them as opposed to the old on/off sending units you have now. Try to secure those ASAP, the correct pressure ones are getting expensive, but cheap working replacements are available.

So, all in all, if you can just switch the ends of the harnesses you will likely only need to add one wire for the tach lead. Maybe ask this specific one on the 442.com tech page. When you do the switch with the connectors - one color at a time - you will know in the end how many more leads that harness has for sure---and what color they are. hopefully its just one.

later,
mike c

Curtis A. - You need just two harnesses for '67. In '66 you would have needed three.

The '67 Rally Pac used the engine harness (P/N 6290616) and main harness (P/N 6290615). The front wiring harness is the same for both. The main harness will work for both automatics and sycromesh applications. The harness is universal in the neutral safety switch area.

Where the harnesses differ a lot is how they are wired for the ammeter. The ammeter that Olds used doesn't measure direct amperage...it measures current flow. If it measured direct amperage the dash would burn up. Thus, it's wired so that it's in the middle of the current supply and the current flow.

Dave R. - You really need the Rally Pac harness...there are two wires in it to accommodate the ammeter. You will be able to use some of the wires in your existing harness. The dark blue (oil pressure), the green (temp gauge), the orange (clock), the gray (dash lights)... the pink wire is ignition feed and so on. The schematic will be somewhat different. The alt wire that goes through the light will be some what different, as will the ammeter and others.

Back to the top

line.gif (839 bytes)

Want to link to this site? Please use this banner.
OLDSmobility.com - The 1967 Olds Cutlass and 442 Resource

The correct URL for this website is http://www.OLDSmobility.com/)
For questions, comments or suggestions, please e-mail me.
All content on this site is © 1999-2008 by OLDSmobility.com/Project 442 Clone, unless otherwise noted. 
All rights reserved.
This page last modified on February 14, 2003.